Preparation:
This activation was planned to coincide with the activations in VK5 that were to celebrate 2 years of the VK5 SOTA Association. As I was on holiday in Sud-Tirol (North Italy), a local mountain needed to be found and this one had the usual requirements for my wife to accompany me – access via cable car with a nice cafe not too far from the top station and not too steep a walk for me to get to the summit. In this case as I was trying to be on the summit before the long path window to Australia closed, I needed to be on-site and operational before 10am local time (UTC 0800) which meant an early start from our hotel in Seis and then two cable cars to the plateau summit. A reccie was performed on a sunny, warm Friday morning to make sure the Saturday activation would be possible time-wise and to decide what equipment needed to be brought along. Once I found the actual summit between the Fillen Cross and Witches Seat (please don’t go to the location given in the SOTA database as you’d be half way down the side of the mountain and probably not able to get back – a common problem it seems with several summits the Alto-adige AA SOTA Italy region), At the summit I saw that the edge of the plateau had an electric fence to deter the cows and horses that roam freely on the plateau from trying to go down the side of the mountain. More importantly I found some large wooden snow barriers. The first I checked seemed rather unsafe but the others were fine. So that would support the antenna mast (squid pole) and the antenna ends would tie to the other barriers. As this is already a high spot, I decided I would take the lighter 6m squiddy rather than my new 10m mini-mast and also decided to use the SOTAbeams linked dipole rather than the Aerial-51 OCF as I only intended to operate 20 & 40m on Saturday. If I had been unable to find a location to support the squid pole, I also had my photo tripod and Diamond vertical antenna packed in the car as a fall-back. Given that I was hoping for a long path contact into VK, I would also take my small Ramsey QAMP 20w amplifier and the 13.8v power booster and LIPO batteries that worked so well at the last activation at Piessenberg.
On testing access to the Internet, so that I could use Rucksack Radio Tool to view other activators spots and to spot myself, I found that despite a stong cell signal on my phone I could not get any Internet connectivity. At least I was able to send an SMS self-spot, not ideal, but better than nothing.
All was set for Saturday, so it was back down the mountain and off to Bozen for an afternoon shopping with the wife and an early rise the next morning.
The Location:
Cable Car to Puflatsch

{the following is a Google translation of the text from the tourist website – thanks Google – especially for the comical mis-translations!}.
Since the year 1960 was the old one-man chair lift, which transported the passengers from Compaccio on the Puflatsch, outdated and in so doing. The operating company had decided to completely modernize the chairlift. This happened in 2009, but the new chairlift to the Puflatsch is not just any chair. For the first time comes on the Alpe di Siusi with the new Puflatsch funicular railway to use a combination.
Complete modernization
The previous line was not only partially modernized. No, the entire old system was completely dismantled and rebuilt from scratch and modern again. Thus, the route of the railway was moved slightly to the right (ie slightly further east). As a result, that the mountain station no longer directly in the house of the mountain restaurants Puflatsch is, but about 200 meters away.
During construction of the new cable car special attention was paid to ensuring that the web harmoniously into the landscape – finally the Puflatsch is often referred to because of its excellent all-round visibility as a viewing platform of the Seiser Alm – fits. The hill station therefore was underground, so built into the hillside. Thus, the landscape is affected as little as possible around the mountain station.
A further appreciation received the new cable car Puflatsch fact that at the same time the base station of the panoramic lift has been moved further down. Thus, the valley stations of the cable car Puflatsch, the panoramic lift and lift the euro are now relatively close to a place, which greatly facilitates the advancement of winter sports on the Seiser Alm.
Combination in winter
While so far, especially in winter due to the low transport capacity of the old chairlift were long queues at the base station, these are now part of the past. In winter, the new cable car Puflatsch is operated as Telemix. Eighth-and six-seater gondolas are alternately hanged on a rope. This ensures that all passengers – their needs – can be transported quickly and easily. Skiers can therefore just as comfortable on the Puflatsch drive like hikers.
In summer, the cable car is powered solely by the gondolas.
The data for the cable car Puflatsch
On a billboard in the valley and mountain stations the data to the new cable car Puflatsch for passengers can be found. Then comes the ropeway technology the cable car Puflatsch by Doppelmayr.
The following data will be announced:
– Cable Car Type: 6.8 CGD
– Height of valley station: 1801 m
– Height of mountain station: 2104 m
– Difference in altitude: 303 meters
– Inclined length: 970 meters
– Travel speed: 5 m / s
– Year: 2009
The Puflatsch
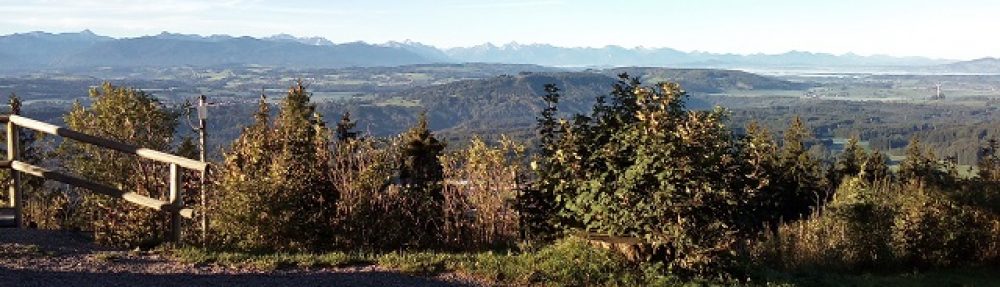
The Puflatsch is visited by both locals and guests of the Seiser Alm throughout the year happy. Here are the famous witches’ benches, the Goller Cross, the Filln Cross and the angels rest. Puflatsch you have excellent views of the lying around the Alpe di Siusi places and mountains in the immediate and wider environment. These magnificent prospects which offer Puflatsch out, make a trip there every worthwhile and unforgettable.
The Puflatsch on the Seiser Alm
 The Puflatsch is part of the Seiser Alm and extends to a height of 2,176 meters above sea level. The Puflatsch – or also called Puflatschalm – one of the most beautiful vantage points of the Seiser Alm, which in turn is having a size of about 56 square kilometers, the largest mountain plateau in Europe. Leaving the mountain station of the Seiser Alm cable car, which is now the main means of passenger travel on the Seiser Alm, extending left hand of Puflatsch.
If you walk on the Puflatsch to offer excellent views of the surrounding mountains of the Seiser Alm, but also to the more distant mountains. So you can Puflatsch from the south the Schlern, the Santner and Euringer and Ross teeth look. In the north, show the Sarntaler Alps, in the east of Sella and Marmolada. In the West can enjoy the view on a clear to the Ortler, the highest mountain in South Tyrol can wander. With a hike around the Puflatsch hikers also have a wonderful view of the locations of the Sciliar area and its immediate surroundings, especially on the main town of Castelrotto. But the witches banks to which there are numerous legends, the Goller Cross, the Filln Cross with its unique view of the Val Gardena valley and the angels rest are important points Puflatsch that should receive special attention.
The hike around
To hike around the Puflatsch, a ride on the Seiser Alm cable car directly to the Compaccio (mountain station of the Seiser Alm cable car) is recommended. From here a convenient, initially rather steep uphill path on the eastern side of the Puflatsch up to the Goller Cross. Already in this way provides the Puflatsch Hut and the arnica hut one Refreshments. On this stretch are also offer excellent views of Castelrotto. From Goller Cross it continues towards witches benches.
The witches’ benches are located on the west side of the Puflatsch. These are two great rocks of porphyry. Today it is believed that once a place of worship has been in honor of the sun god at the witches benches. Due to the peculiar appearance of the rocks that actually look like petrified seats, many legends have arisen. This porphyry formations have been given the name “witches banks”.
From the witches banks should continue right up to the Filln Cross. From here you can look the best on the Val Gardena valley, but especially on the village of St. Ulrich and the Bryan Group Bulla. The Filln Cross is often used by many because of the excellent prospect to take a short rest here. The Sella group, Piz Duleda and Sass Rigais and Peitlerkofel can be admired from Filln Cross as well.
Angels Rest
From Filln Cross can descend migrate towards mountain inn Puflatsch again. Directly at the mountain inn Puflatsch is the mountain station of the cable car renewed in 2009 Puflatsch, which can also be used by the way, if you want to bypass the ascent from Compaccio. There is also the Angels Rest near the mountain inn Puflatsch. Again, this is an observation deck that offers excellent views of the surrounding mountains. The Angels Rest, also known as “angels waiting”, was created by a South Tyrolean artist. In a square platform is an accessible roundabout, where a all-round steel plate is, by means of which all the contours of mountains can be seen here to be adjusted. The names of all visible from the angel rest of mountains are engraved including the altitude in the steel plate. And who takes the trouble to count the number of mountains with at least 3,000 meters above sea level, will find that can be admired by the angel rest of 53 three-thousand. Directly to the viewing platform perched on a pole an angel. But not only for the angel is the angel rest on the viewing platform of the Seiser Alm – as the Puflatsch can be called quite – an almost heavenly place.
For the hike around the Puflatsch you should definitely take at least three hours. While the total walking time is estimated at about three hours, due to the magnificent views that can be enjoyed by the individual viewpoints and Refreshments (Arnica Cottage, Puflatsch hut, mountain inn Puflatsch) you can hold a whole day easily on the Puflatsch spend.
Flora and Fauna
The hike around the Puflatsch can also be referred to as a botanical walk, because a rich flora is to be found. Who has special interest in the flowers of the Seiser Alm, takes place on the Puflatsch before a wide variety. To grow and thrive here the Spring Gentian, Fringed Pink, the Black sprouts in various color combinations, the Turk’s cap and the (mosquito) Handel covenant.
Regarding the fauna of the Brambling, the fir Higher and a large number of butterflies on the Puflatsch be admired.
{ end of funny google translated text }
The Activation:
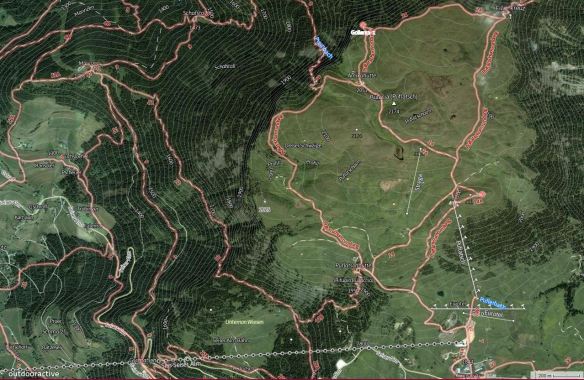
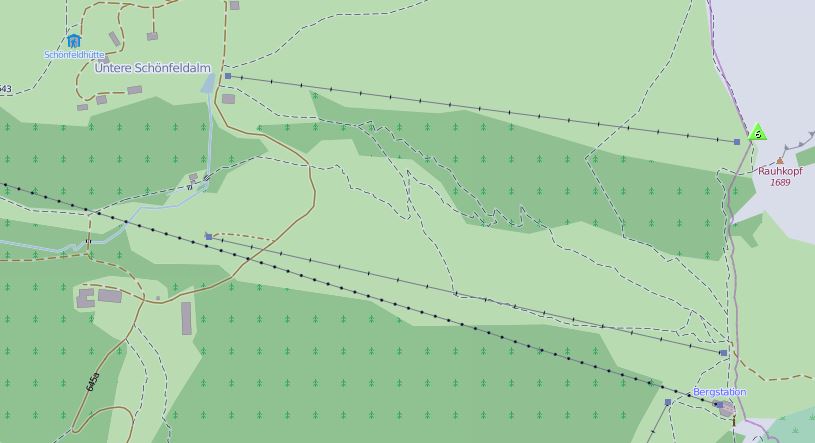
Map of Summit area
The trip on Saturday was the same as on the “reccie” on Friday. A 25-30 minute ride in the Seiser Alm cable car from Seis to Compatsch, a ten minute walk and then a 10-15 minute ride from Compatsch up onto the mountain plateau where Puflatsch (or Monte Bullacia as the Italians call it), is located. Once at the top station of the cable car, it’s a good 30-35 minute walk to the planned activation spot on the summit. I had a little luck as the second cable car started operation at 8:50 rather than the official 9am as I and a couple were waiting. This meant I managed to get to the summit and be operational about 15 minutes before my alerted time of 0800 UTC or 10am local.
Cloudy, damp and about 2 degrees on the summit – the predicted sunshine didn’t come until I was back down in the valley in the afternoon. A “frozen fingers” activation! I had gloves but had to keep removing them to check the spots on the phone (managed to fix the Internet connectivity on Friday night (it was an Android setting that had been reset)). As well as the cold making the activation uncomfortable, the Ramsey amplifier wasn’t working so I was restricted to 5w out. At the time it appeared that my 13.8v inverter may have been the cause (no DC to the amp) however on later inspection at home, the invertor was OK however the fuse in both the 12v plug and inside the Ramsey amp had blown, suggesting another transistor failure. – more to look at before the next activation!
Once operational I could not hear anything from VK. Don G0RQL and a couple of others said 20m conditions were not good and no VK’s had been heard so far that morning. I had thought I might be too late for the long path but with the lifts I could not have got there any earlier in any case.
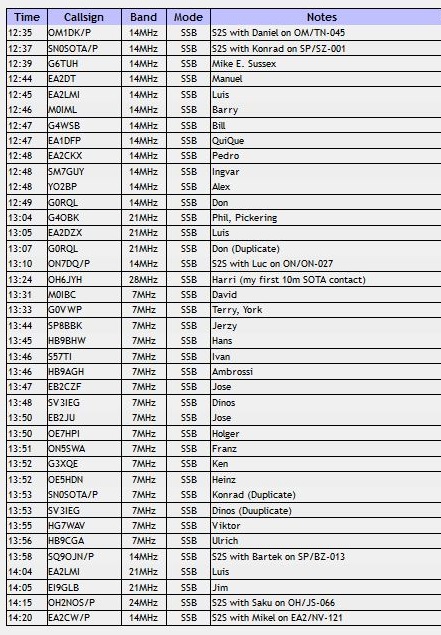
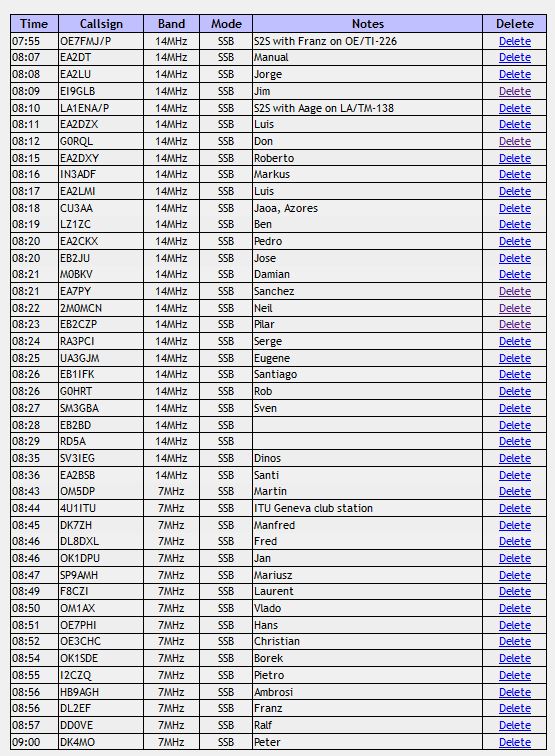
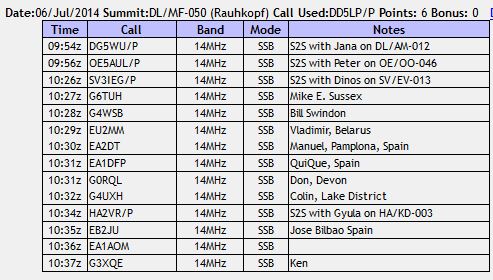
Luckily there was no noise from the nearby electric fence and I managed to work around Europe, from Russia in the East, Norway in the North, Ireland to the West and Spain, the Azores and Greece to the south. All reporting acceptable signals even with just the 5w from the FT817.
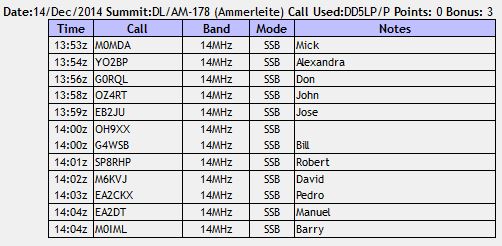
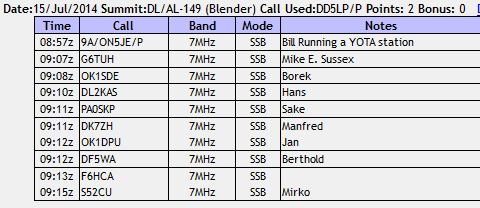
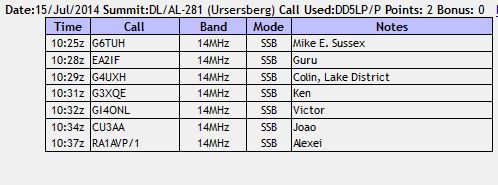
A total of 43 contacts in one hour including two S2S contacts but unfortunately no VK contacts. Well this is a new association activated for me in any case and it was good to catch up with the usual European chasers from a little further away than my normal summits and also nice pick up some new chasers. I think this is the first time I have had chasers from Russia calling me and there was the official IARU station from Geneva as well.
Slide Show.
This slideshow requires JavaScript.
Equipment:
Yaesu FT817ND,
SOTABeams 40/30/20 linked dipole.
6 metre squid pole.
Log:

Conclusions:
Test, test and test again! If I had tested the Ramsey amp on Friday night and found it was not working, I would have saved carrying 3 kilograms of equipment I could not use by leaving the amp, the invertor and two 5500maH LIPO batteries at the hotel.
73 ’til the next Summit!


You must be logged in to post a comment.