
Adding Bluetooth to the Xiegu G90 HF transceiver.
This article covers both the “proof of concept” construction and using lessons learnt, a final smaller, more portable operations compatible solution.
Any changes to this document will first appear on my website at dd5lp.com under Equipment/Xiegu G90. (direct link: https://wp.me/P3u0rP-1N2 )
Stage1: A “proof of concept” action.
First, it is important to define what we are doing here. Some modern radios have Bluetooth built-in so that they can be operated remotely from up to 10 metres away. The G-90 does not.
I want to add such control to the XIEGU G90 (this may also work with the X5105 model as well, but this has not been tested). It will not work with the Xiegu X108G as its CiV control is performed over a MicroUSB port rather than via a 3.5mm audio jack, serial port. I do not intend to open the radio case, rather I will add standard external modules that are available over eBay and other online retailer sites. There are two parts to this action.
Audio via Bluetooth.
The first stage is to get audio to and from the radio from some Bluetooth enabled headset or earpiece, as used with many Smartphones these days. I expected this should be the easy part of the solution while there are many standard solutions available for this that can be purchased for a few Dollars/Euros/Pounds. Unfortunately, this part of the solution caused me the greatest problems as the issue with the common units is that they operate as a transmitter or a receiver needing to be manually switched between the modes or even they only operate one mode at a time by a cable being inserted into one or the other socket. This is not going to work with a “full-duplex” Bluetooth Headset (note we need to use a Headset, not Headphones – a Headset is Headphones with a microphone). The Bluetooth electronics in Smartphones have this “duplex” capability but to find an external adapter with the same capabilities is not easy. Investigation showed that “aptX” support can supply what is required to handle audio going to and coming from the headset at the same time but even an adapter that says it has aptX (often one that also has NFC) isn’t always one that will handle two-way audio! The alternative using two BT adapters, one running as TX and the other as Rx path, will not work as the headset is designed for use with a smartphone and hence a single (duplex) channel.
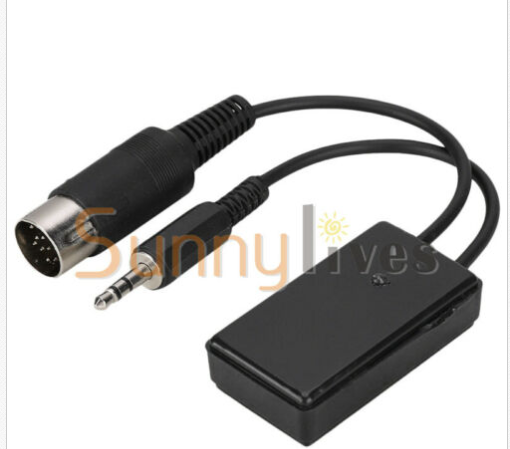
I gave up looking at the direct adapter solution when I saw that an audio plus PTT solution is already available for amateur radio “Handy Talkies” (HTs). These kits which include the TxRx adapter, earphone/headset and PTT button are not cheap, so shop around but make sure you are buying the complete kit and not just the earphone at the advertised price, which is not always clear!
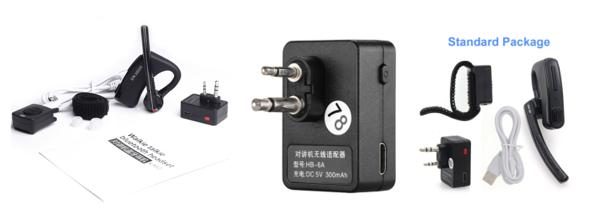
The ideal would be just to buy the “HB-6A” adapter in the middle of the picture above and I did eventually find one company selling just that at $25 plus P&P after I had ordered a complete kit. Prices for the same kit can vary from €29 to €90! The headset alone costs €13.95. Shop around and the “kit price” from several AliExpress and eBay sellers is around €40 including tax and shipping. Of course, if you don’t already have a Bluetooth headset that you wish to use, then the one in the kit might be fine as it’s supplied to use with the adapter in a communications mode. I already had an over the ears BT headset, so now I have both Headset and earpiece/microphone.
After wiring this set via 2.5mm and 3.5mm stereo jacks to the ACC socket mini-DIN plug, pairing the headset to the unit and testing, I found two problems.
- I had no audio getting to the radio from my Bluetooth headset. This was simply solved by switching the input from the microphone socket in the G90 to the LINE input on the ACC socket via the system menu. This is reached by pressing the <FUNC> button once so that the orange light comes on and then the <POW> button on the right-hand side of the radio’s faceplate, twice and then using the main tuning knob to change the setting from MIC to LINE. You can also access the levels of the line input and output in these menus and I suggest you set both of these initially to their top value of 15.
- Then the microphone level was far too low. As I had wired to the ACC socket – it expects computer level (1v peak-to-peak) audio, whereas the HT, where this BT adapter would normally connect to, would be expecting electret microphone level audio. Now I could wire up an inline RJ45 connector and feed the audio into the microphone socket of the G90 but I decided rather than doing that I would add a small €3 LM386 amplifier module that is normally used with Arduino projects.
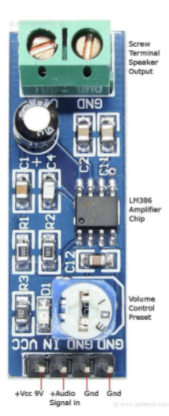
This has the advantage of having a volume control, so I can set the audio input level correctly.
The first test of this modified set-up was fine up to about 3 watts but after then there was constant output indicated even when I wasn’t talking – RF Ingress! So, I added a parallel pair of a 0.1 (104) and 0.01 (103) µF ceramic capacitors across the input and output of this pre-amp module and a 0.1 (104) µF capacitor directly on the mic connector on the 3.5mm jack socket, to the ground (earth) connection on the 2.5mm jack socket and with my next test… No RF Ingress – all levels were quiet until I spoke then the output meter indicated full scale on 20 watts. I suspect I will need to back the gain off a little now H.I.
A total surprise was that after pairing the little PTT button that also came with the audio adapter set, it worked straight away with no issues at all, meaning I can use this rather than the PTT option in the remote-control app (more about that app below).
To avoid always having to unplug the module to charge its internal battery via a micro-USB cable, I added a regulator board designed for the Raspberry Pi to take the 8 or 9v coming from the G90 ACC socket down to 5v for the mini-USB socket so that the Bluetooth audio module is constantly being trickle charged while in use. This supply also has a spare micro-USB plug to charge the PTT button unit when needed.
CAT Control via BT.
The second part of the solution is to get CAT (Computer Aided Transceiver) remote control commands over a Bluetooth serial connection to the radio from the remote device.
Only by having a separate “remote control console” with the Bluetooth headset can the G90 radio be operated fully “cordless”.
Background – ICOM has used a 3.5mm jack for their CiV CAT connections on their rigs for some time. Xiegu on models other than the X108G (which uses a micro-USB port) has also adopted the 3.5mm stereo jack along with a subset of the ICOM CiV command set for remote control of the radio. There is one important difference, however – the ICOM radios although fitted with a stereo jack, have Tx and Rx on the tip of the plug shorted together and don’t need a connection to the ring. The case is earth. Xiegu keeps Tx and Rx signals separate and uses therefore all three connections.
There are already BT comms adapters that plug into the ICOM rigs on the market and cost around 15 Euros from China.
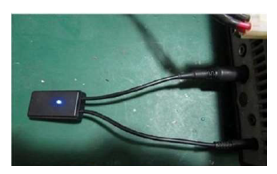
Figure 1 Here is one example of the BT adapter for ICOM radios available over eBay.
These dongles however are wired for the ICOM configuration of running TxD and RxD on a common line and are pre-set to 9600 Baud (whereas the G90 needs separate TxD and RxD lines at 19200 Baud) The DIN plug (which supplies 8v DC will not fit the G90). So, we will need to make some changes. As this CAT command BT module will need to take its external power supply from the 9v DC supply from the G90 ACC Mini-DIN port.
IC-718 / 7000 accessory socket – standard 8 Pin DIN – this is what the dongle comes wired for.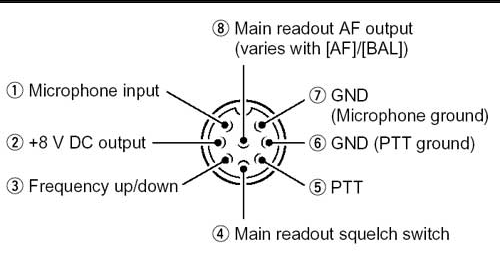 The XIEGU G-90 accessory socket is an 8 pin MINI-DIN
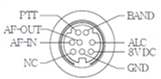
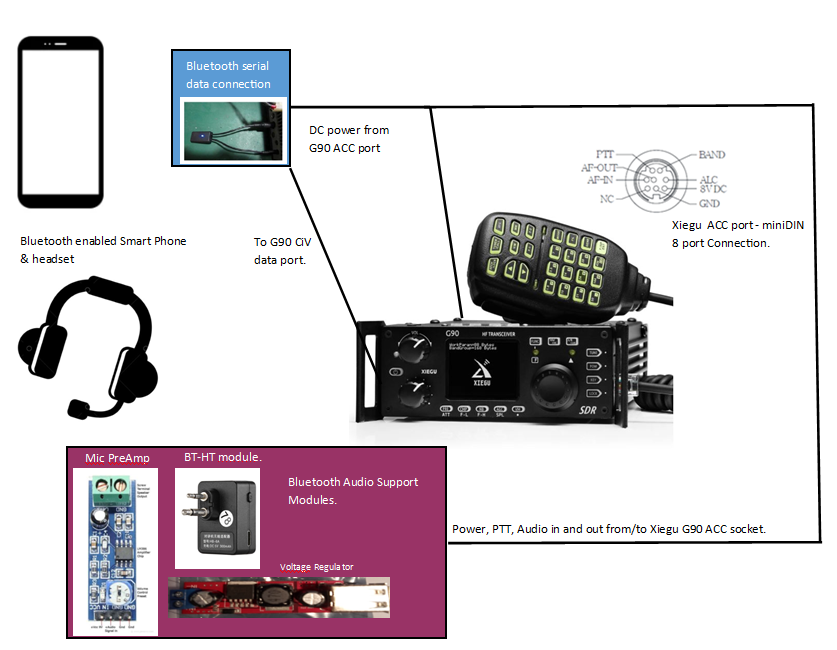
This ACC socket has DC supply, PTT switching, audio in and out all of which we need to use.
We need to replace DIN with Mini-DIN plug on this BT adapter:
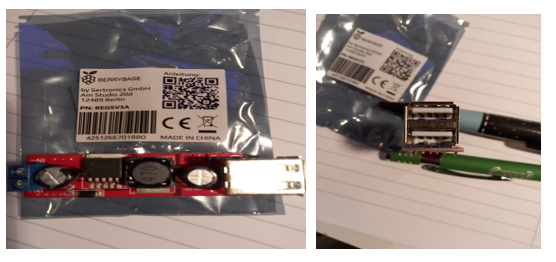
Here’s a picture of the eBay dongle opened up: It’s a PC board module (known as an HC-05) soldered onto another board that has a voltage regulator on it. If you look on the left-hand side you will see that two connections are bridged together with solder;
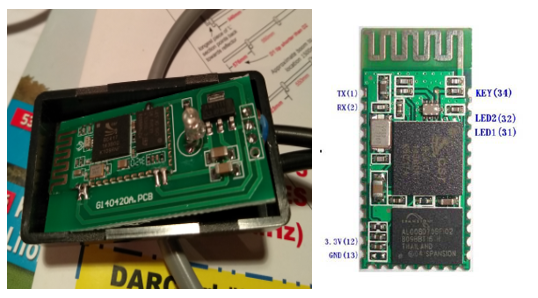
Figure 2 The dongle opened up Figure 3 HC05 BT module diagram
Using the graphic for the HC-05 module and tracing the lines back, it is clear these are the Rx and Tx data input lines which both go to the 3.5mm plug, so this bridge needs to
Using the graphic for the HC-05 module and tracing the lines back, it is clear these are the Rx and Tx data input lines which both go to the 3.5mm plug, so this bridge needs to be removed so that we have TxD and RxD separate as supplied and needed by the G90. As the voltage is regulated down to 3.3v by the carrier board, a supply of 5-9v DC is fine to power the dongle. Of course, I had to remove the full-sized DIN plug from the lead and fit a suitable mini-DIN plug and wire to the available supply pin from the G90s accessory socket. Later for the combined BT CAT and BT audio solution, the audio in and out wires was also connected through to the mini-DIN plug.
The G90’s serial port ONLY works at 19200 bps, so the module needs to be re-programmed from 9600 to 19200 bps before it will work. For this, you will need another small par-dollar interface board and some free software to do the speed programming change. Full details can be found on pages 4 & 5 of this document: https://www.yo3ggx.ro/btcat/FT8x7_DIY_Bluetootth_CAT_interface_v1.pdf Credit:Dan Toma YO3GGX.
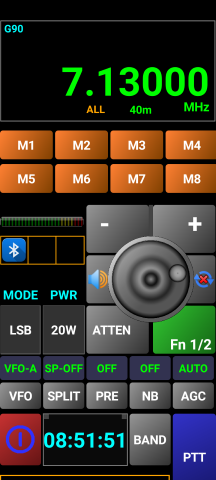
After updating the serial speed of the dongle, I was able to control several useful functions of the G90 radio from the PocketRxTx App running on my Android phone and from the jAReC v4 program/server running on any platform that supports JAVA (in my example below, this is running under Windows 10).
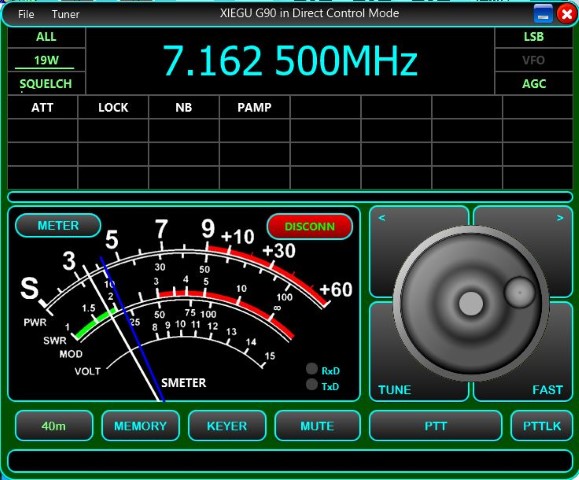
Both of these programs are written by Dan Toma YO3GGX and allow a lot of customisation by the user. PocketRxTx has a free (with adverts) and paid (€5) version on Google Play Store here: https://play.google.com/store/apps/details?id=ro.yo3ggx.rxtxpro and jAReC is free and available from Dan’s website – here: https://www.yo3ggx.ro/
Now it’s time to combine the purchasable external modules in a way to add Bluetooth Audio and CAT connectivity to the XIEGU G90 and possibly other radios.
In line with using modules, as the Handy Talkie, BT audio unit runs from an internal battery that has to be regularly charged up and the BT-Cat module needs to be powered, we need to supply their required DC voltages. While the BT-CAT module is happy with the 8/9v that the G90 can supply over its ACC socket – the Audio interface only expects 5v onto its micro-USB charging port.
In theory, a very simple solution might be to insert a resistor from the G90’s 9v DC supply however as the load will change depending upon how charged or uncharged the internal battery is, it’s best to use a proper regulator.
Looking around I found the small board below, that is used to power a Raspberry Pi with 5v to its USB connector, so this should suit our needs quite well. The charging cable supplied with the HT-BT audio unit has one USB-A connector and two micro-USB connectors so one will be connected permanently to the HT-BT unit and the other I will leave available and accessible to charge whichever Bluetooth headset is in use or the PTT button.
This board or a similar one should be available from stores that supply parts for the Raspberry Pi and microcontroller kits.
I got mine from Reichelt.de – https://www.reichelt.de/entwicklerboards-spannungsregler-6-40-v-dc-auf-2x-usb-5v-3a–debo-dc-2xusb-p242778.html
Here is the connection overview.
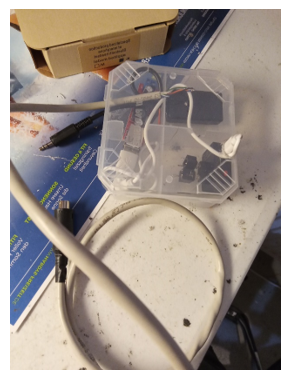
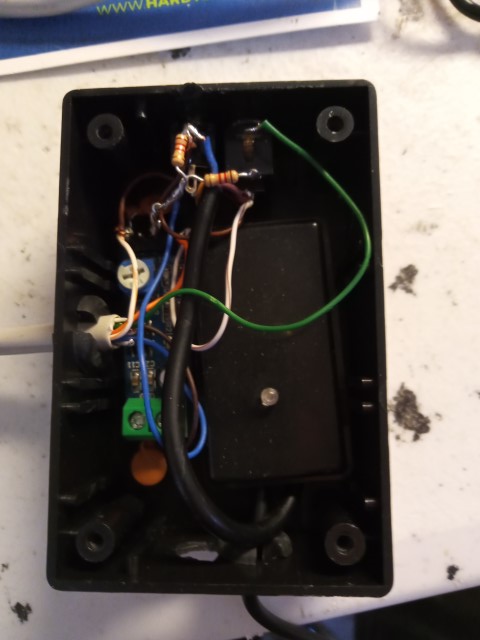
Picture of the box during its construction.
Picture of the completed interface unit in all its “glory”!
The cable with the mini-DIN plug from this box plugs into the ACC socket on the rear of the G90 and the stereo 3.5mm jack into the data socket on the side of the head unit.
Note: do not plug the data connection in until the radio is operating as otherwise, the presence of a cable in this socket can cause the radio to think it is in the middle of a firmware upgrade and to set it back into normal operation can be difficult should this occur.
When starting the use of the Bluetooth adapters, the HT module needs to be turned on by a long press on its button – this is inconvenient as it means the clear plastic box has to be opened. Once devices have been paired to the HT-BT unit once however they automatically pair again when they are turned on. (for the first time pairing procedure, refer to the HT BT-adapter documentation that it is supplied with (a magnifying glass may be needed).
Improvements planned.
The intention of building everything into the clear plastic box was always going to be a temporary solution. The use of the 2.5 & 3.5mm sockets on the HT-BT unit and its need to be turned on manually every time it is needed are two non-ideal situations. In a hope to resolve this into a better final solution, I have ordered an inline cable connector that has the stereo sockets in the correct spacing for the HT-BT unit and I have decided not to trickle change the BT-HT unit but rather have it accessible in an elongated cable harness with plus one end into the ACC socket and the other into the G90s data-port so that adding Bluetooth to the G-90 will then be the addition of just one cable with a small box in its middle housing the audio pre-amp and the BT serial board.
The main thing is that the solution has been proven here – it is possible to add Bluetooth support externally to a Xiegu G90 using easily available modules and without any changes to the radio being needed.
Stage 2: Moving on from “Proof of Concept” to a portable friendly design.
Lessons learnt / improvements to be made – January 2022.
The POC box is too large to be practical for portable usage and is awkward when it has to be opened to “pair” the HT BT TxRx device with a BT headset.
The extra cabling, board and space to allow trickle charging of the battery in the HT BT TxRx device is not essential as the little RxTx unit’s internal rechargeable battery lasts a long time before requiring to be recharged.
So, the new design will have;
A smaller, more portable operations friendly, box.
No voltage regulator board to take the 8v from the G90 accessory socket down to 5v which was being used to trickle charge the HT TxRx device – it will be charged externally when needed.
The HT BT TxRx unit will be located externally to the box so that pairing it to the Bluetooth headset does not need the box to be opened.
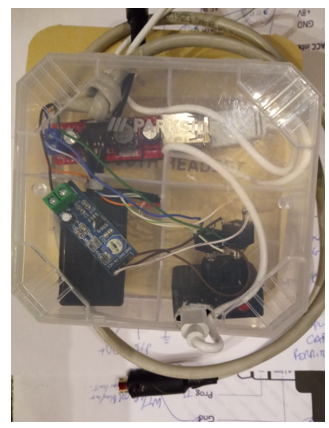
The mic-preamp will be retained as will the self-contained remote commands CAT Bluetooth unit and these will be housed within the new smaller box.
After looking at the “new” box, I realised that I had used it previously for interfacing my HT speaker microphones to various radios, which meant, I already had the correctly spaced holes for the 2.5- and 3.5-mm jack sockets and so could mount these along with most of the wires, straight across from the proof of concept box into this smaller and more “portable-compatible” box and have the HT audio BT transceiver module plug into the outside.
Here are various stages of the build:
So here we are, all boxed up and nicely labelled with the handietalkie BT TxRx unit plugged in: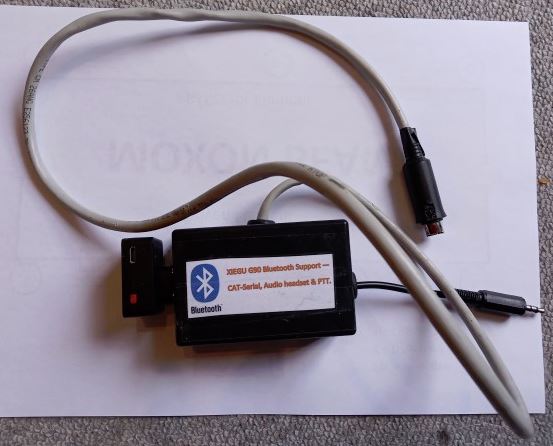
Unfortunately, on testing, the CAT Serial interface had stopped working and while the receiver audio is finding its way to my Bluetooth earpiece perfectly when I press the Bluetooth PTT switch after about a second the audio level to the microphone input is off the scale. This is a similar problem to what I had earlier in the POC model, which was cured by the addition of RF decoupling capacitors on the input and output of the microphone preamplifier. Those capacitors are still in place, so I decided to add a ferrite RF suppressor into the circuit. An alternative would be to route the audio received by the HT BT TxRx unit over another cable to the microphone input socket instead of the ACC socket on the G90. This solution then simplifies the design by the removal of the microphone pre-amplifier board but adds an extra cable and as there is no guarantee that the audio levels would be correct, I prefer to keep the pre-amplifier in the circuit.
CAT command route fixed but audio overload is still a problem.
An inspection found that shorting connections within the 3.5mm audio jack plug that plugs into the radio’s front CAT port was causing the CAT commands not to work. Once I re-soldered and applied heat shrink as an insulation media, the CAT commands worked again. I will however replace this plug and cable to avoid further issues.
The addition of the ferrite that is supposed to present a resistive inductance to HF signals onto the input lead of the audio pre-amplifier had no effect whatsoever and as soon as I pressed the Bluetooth connected PTT switch the RF output of the transceiver still went full scale with the audio feed to the radio being overloaded.
Adding a decoupling capacitor to the DC line from the ACC socket on the G90 and two clamp-on ferrites around the cable from the box to the ACC socket, which could be acting as an antenna and feeding the RF to the pre-amplifier board either via the audio in or the DC power line did not cure the problem and further investigation pointed away from RF ingress and towards the gain from the LM386 microphone pre-amplifier being too high as when I turned the gain on the board back to minimum and reduced the input line level value in the radio down to 3, the audio input to the rig no longer pins the RF output to full power until I talk. It did still seem a little “hot” however, so an attenuator in the form of a voltage divider of two 1k2 Ohm resistors was added across the input to the pre-amplifier.
The voltage divider attenuator can be clearly seen in the photo below with also the tabs on the two audio jack sockets acting as the solder points for connecting wires between the various modules and audio or power lines together.
Why this attenuator was not required in the proof of concept circuit is not clear however the action has been effective and now once the audio drive level is set as a combination of this physical control potentiometer and the line input level menu setting in the radio, the headset works. As different Bluetooth headset microphones may have different audio output levels an adjustment of the input level in the G90s menu will most likely be needed when changing between them. Indeed, in an on-air test with Neil PA3OMG (Thanks to Neil), he commented that the audio level was understandable but low with the Bluetooth headset, especially when compared with the standard Xiegu Fist microphone. This was less to do with level settings and more to do with the construction of the headset. Both of my Bluetooth headsets (the earplug type and the over the ear type) have a microphone behind a small hole on the earphone casing. An over-the-ear headset (either single or dual-ear) with a boom-mounted microphone coming in front of the mouth may be a better solution for ham radio usage. Now I just need to find one that is small and light enough to take along on portable activations…
Like this €10 model – but it has issues pairing with the HT BT Dongle – it pairs fine with a smartphone.
It appears the problem is Bluetooth version incompatibilities. The headset set is BT v2.1 and the dongle is v3.0 – while some backwards compatibility exists so that the 2Mb/s v2.1 can transfer data to the 24Mb/s V3, the handshake may be a problem. The headset has a BT ID of “0000” but of course, there is nowhere on the dongle to enter or accept this code. While my MPOW headset with V4 BT works, (but is too large and heavy for portable use) I can only conclude that having a BT headset using a version of BT older than the dongle’s 3.0 is going to have problems.
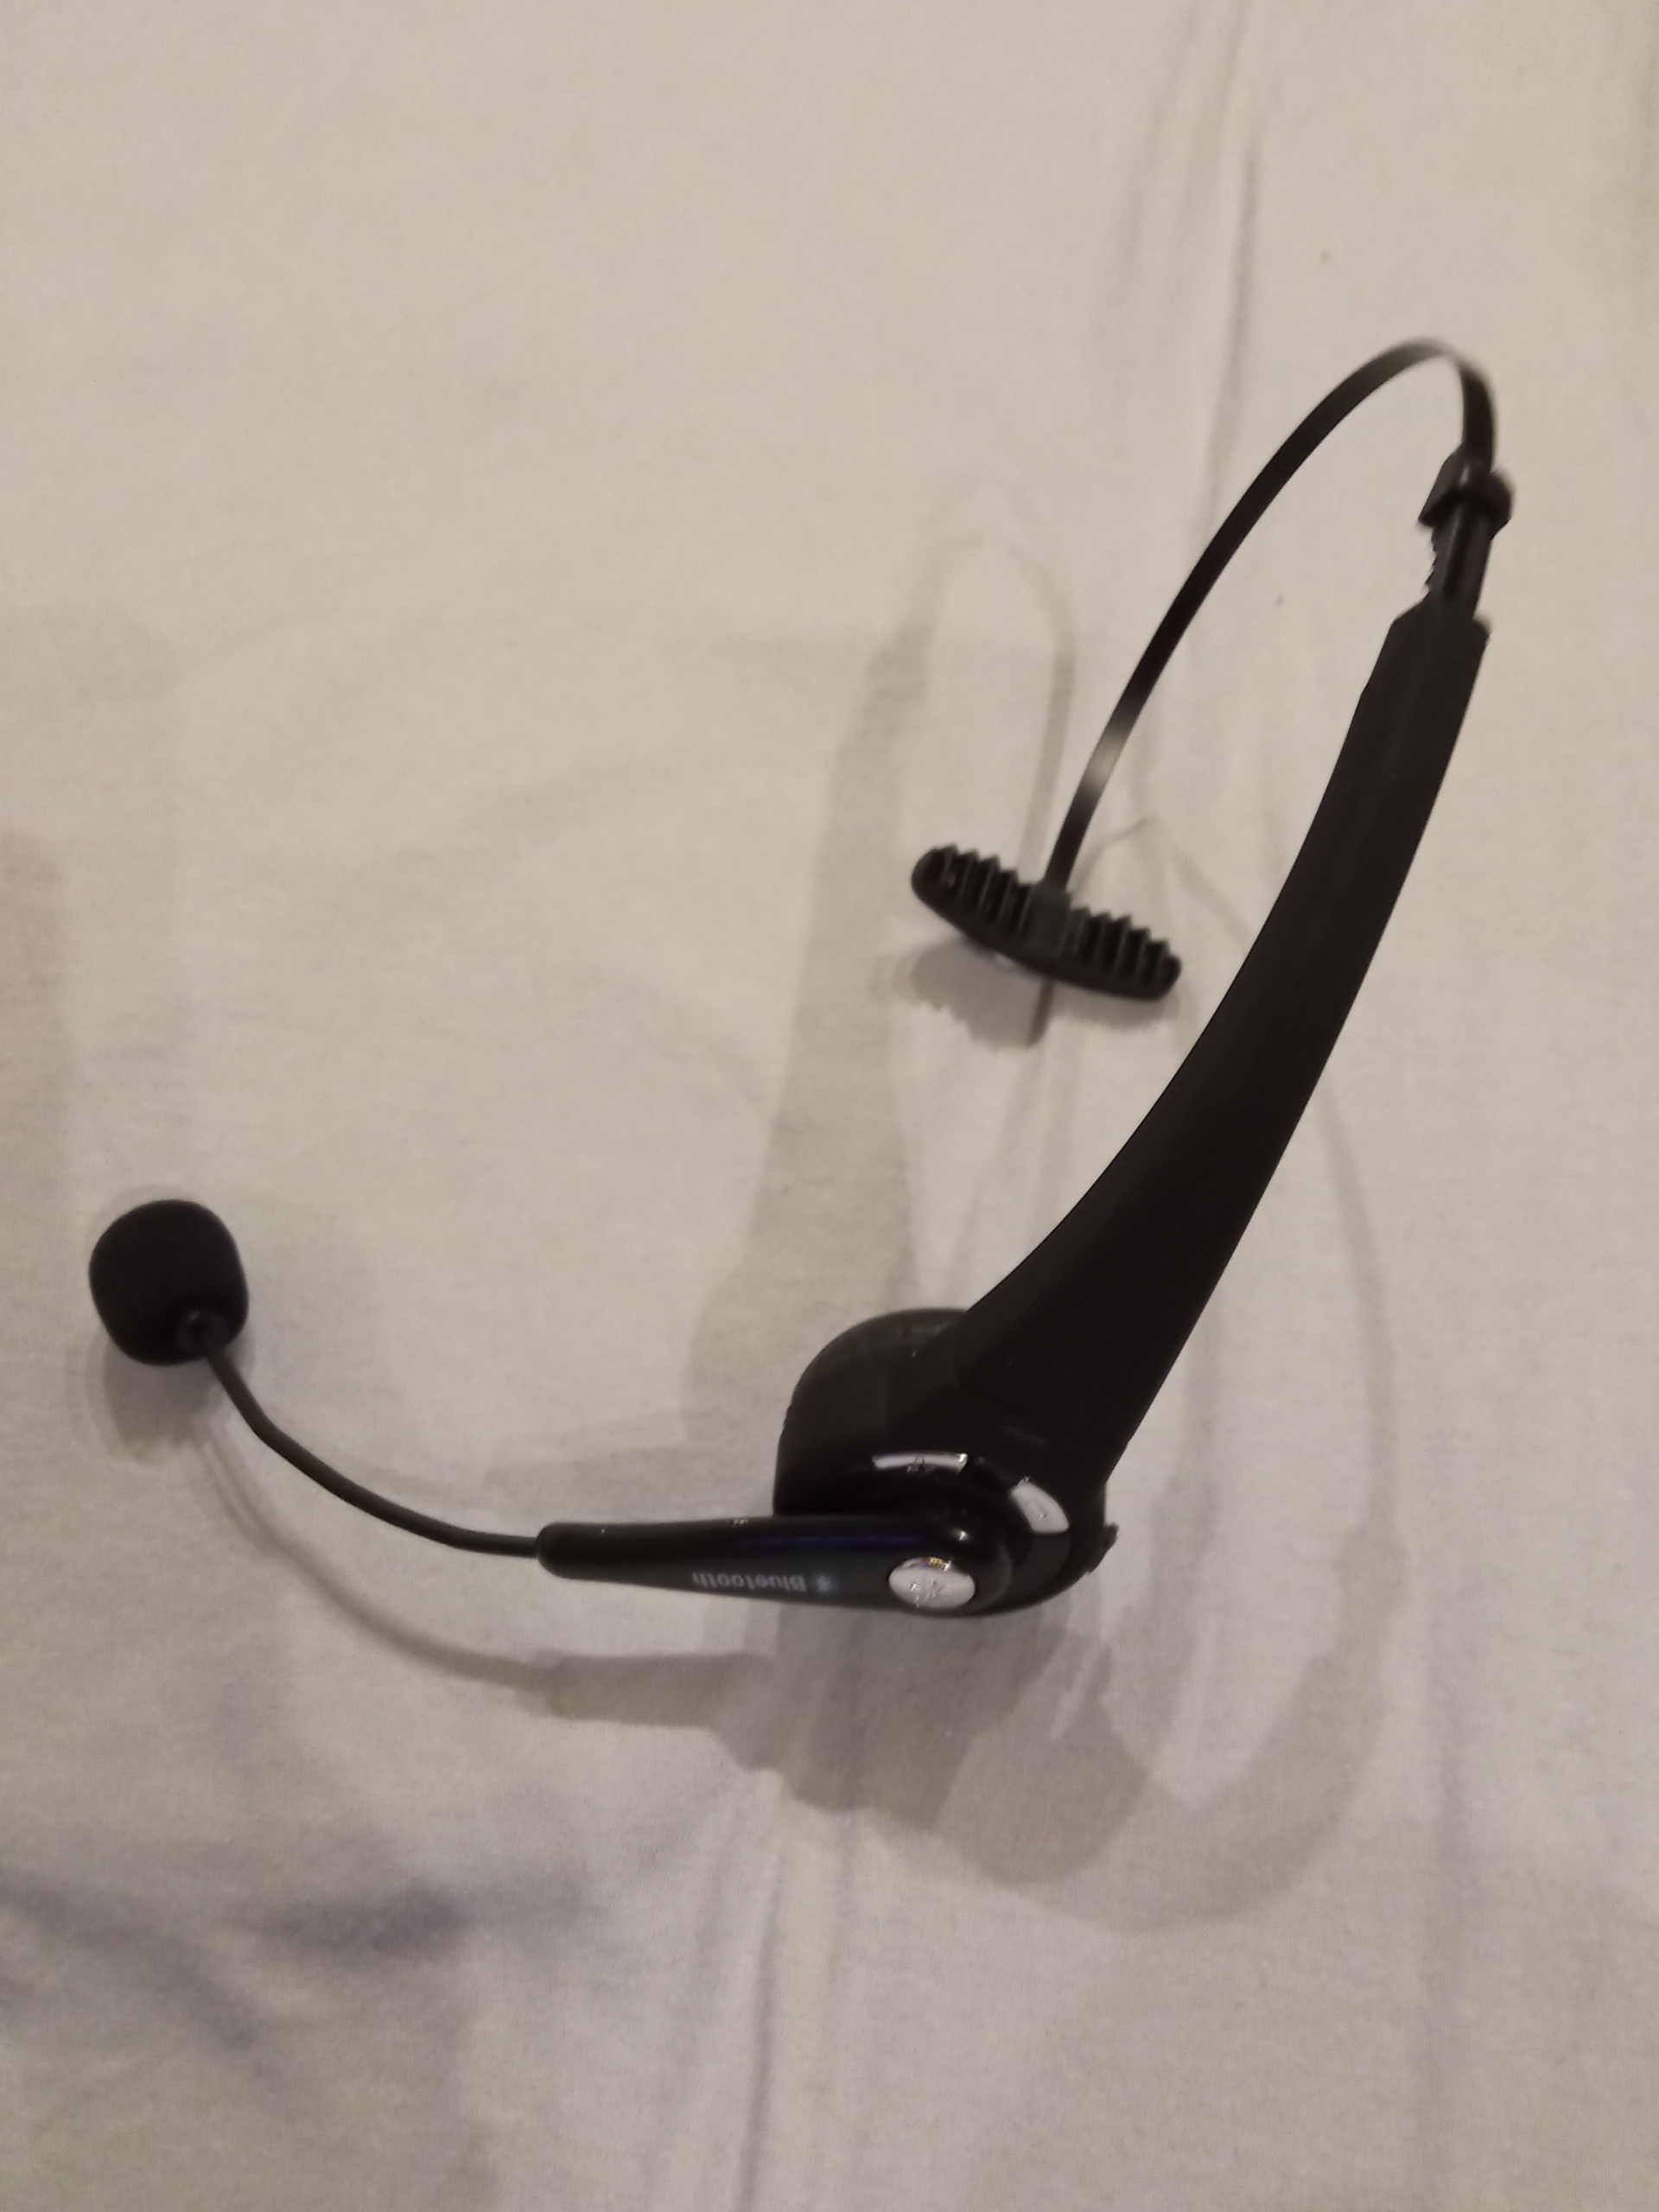
And we have a winner! I bought a Medion Bluetooth v5 one ear headset for €20 reduced from €30 and the version difference does appear to be what caused the simple Chinese (BT v2.1) headset not to pair with the HT-BT v3 dongle. The v5 Bluetooth Medion headset does pair and work with the radio both on receive and transmit. Thanks to Marko DD2ZN whom I called when he was on a SOTA summit for a report. The audio is a little muffled but workable. Perhaps I’ll try it next time with compression on.
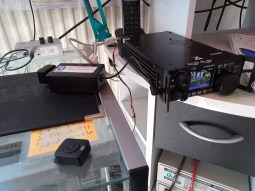
Here is the Medion headset that I bought and the complete system in use;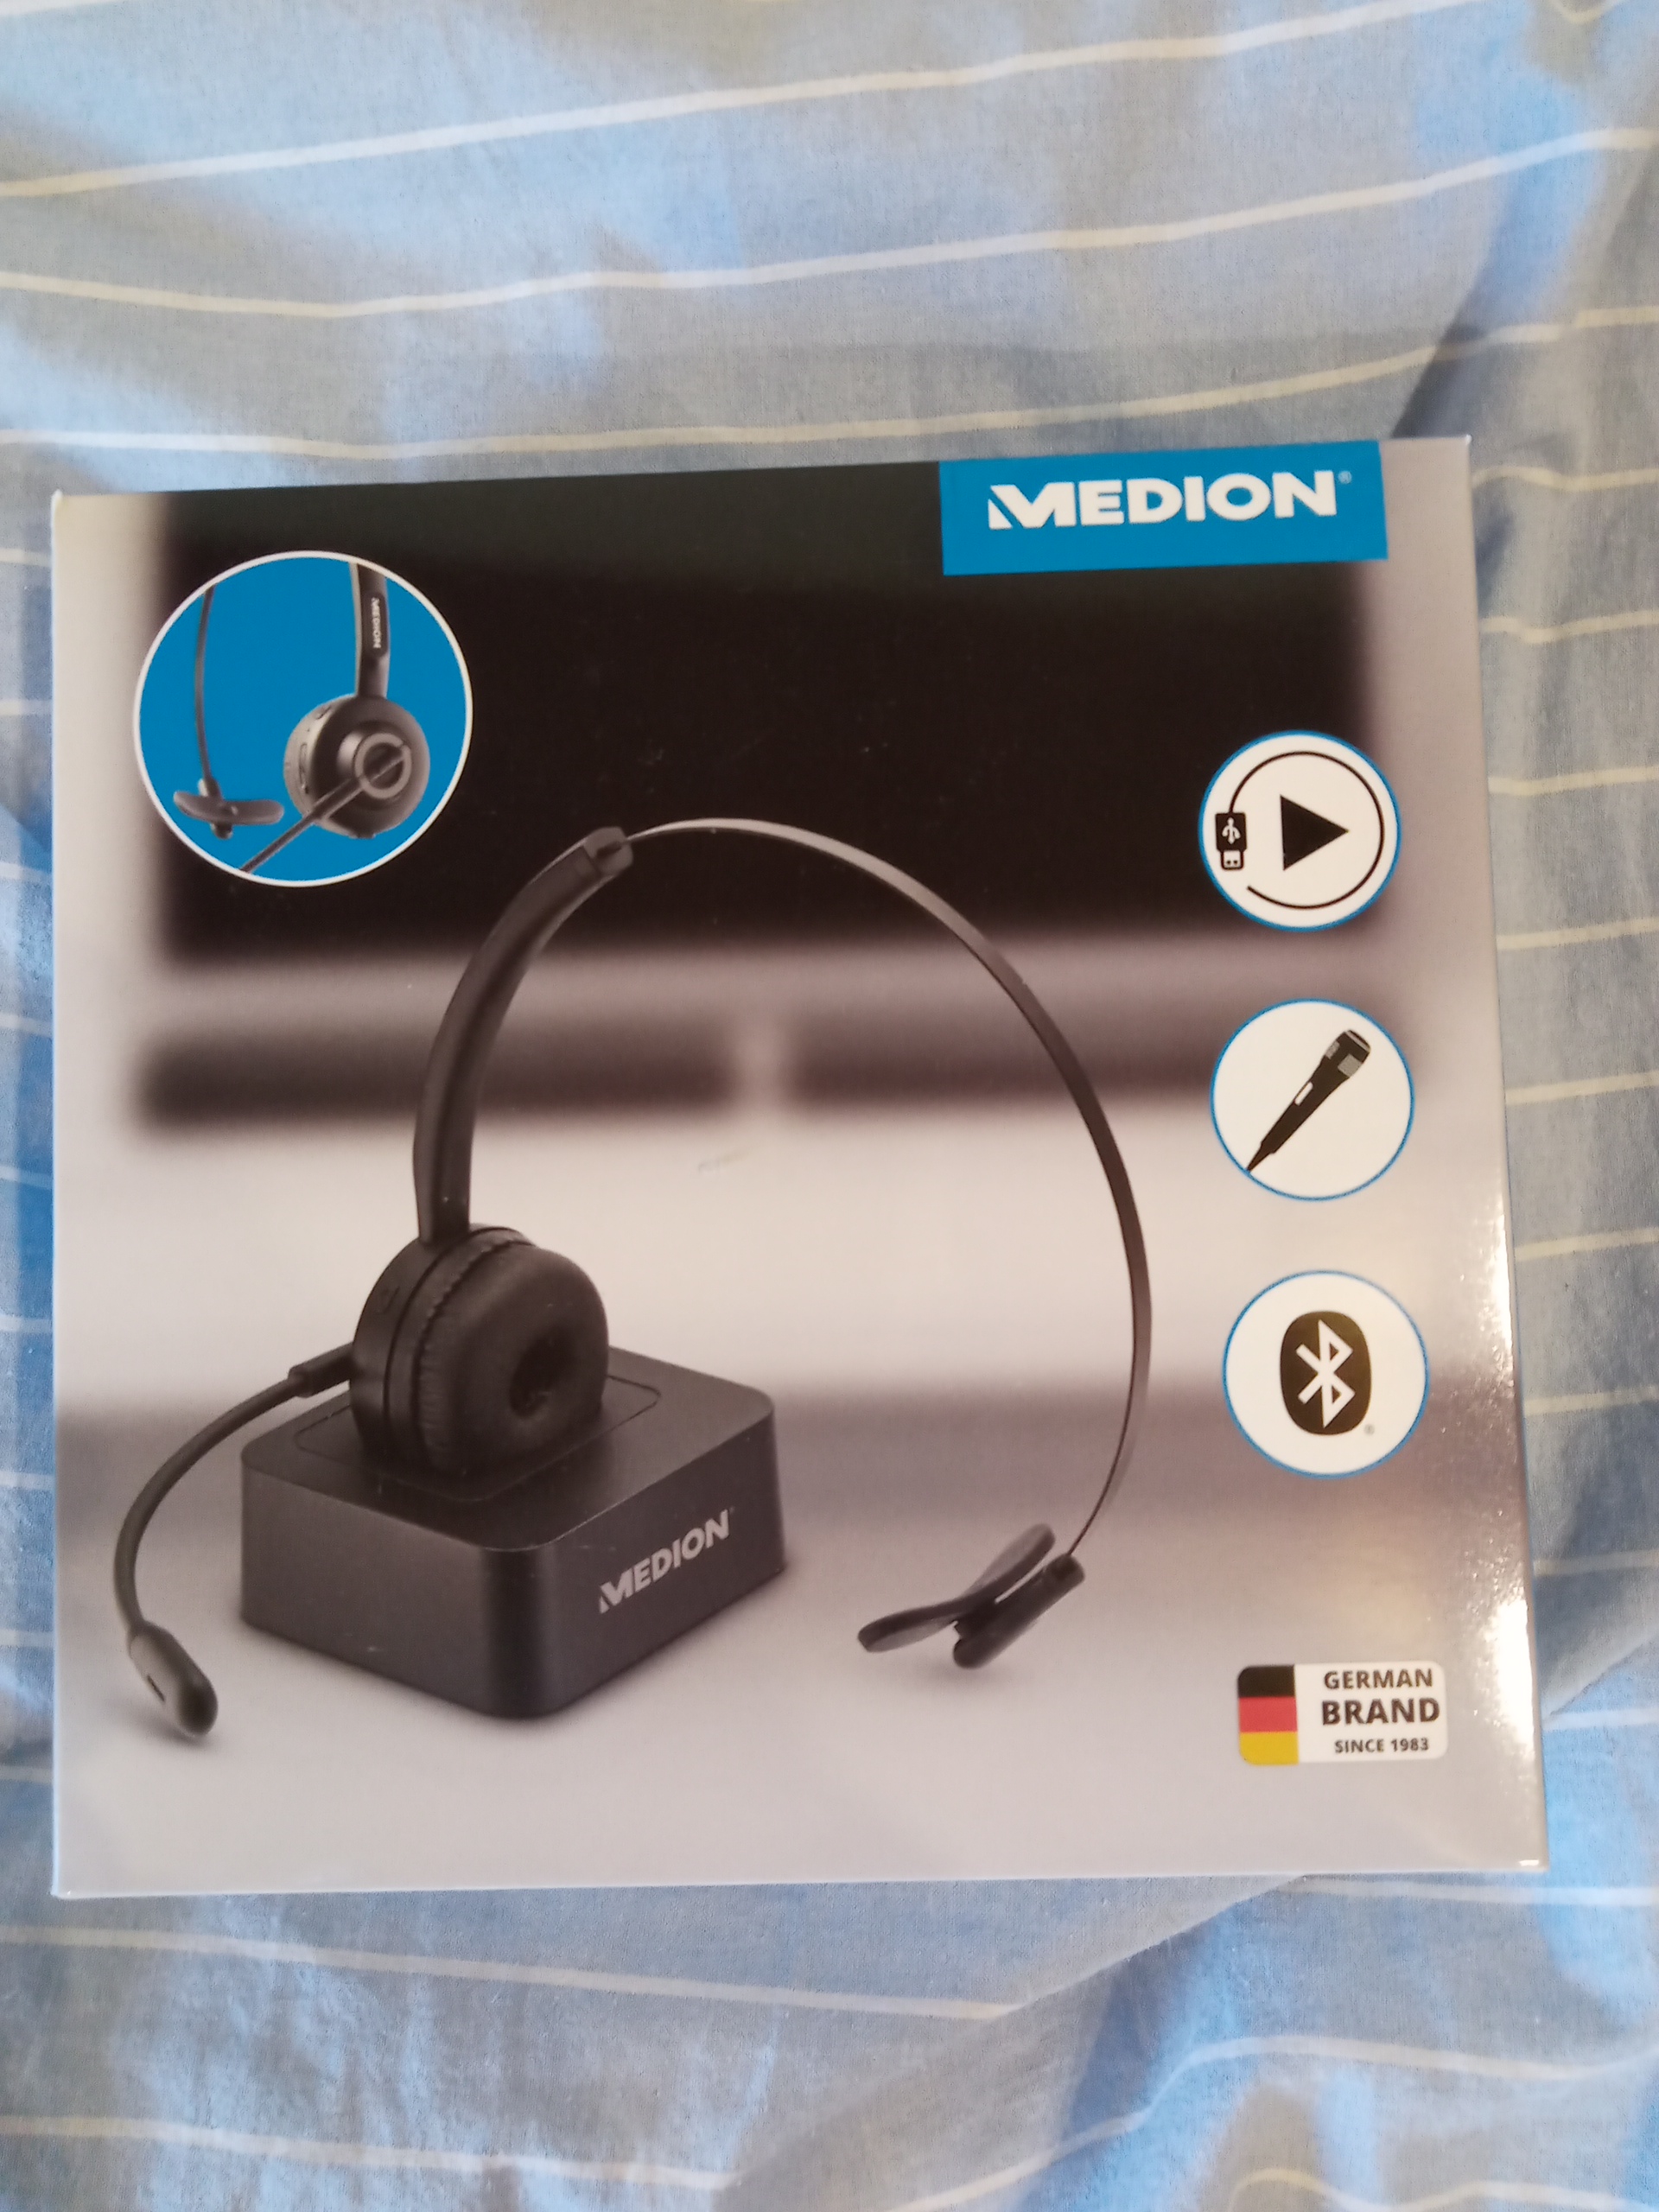
LESSON LEARNT:
When working with a “dumb” device (i.e. one where you can’t enter the pairing code), make sure that the device that you are attaching is compatible with that dumb device. It “appears” that the dumb Bluetooth device will not support the automatic connection of devices that run an earlier version of Bluetooth. In this example, the first headset was only BT v 2.1 while the HT BT Dongle is BT v3 and it would not pair. The next headset is using BT v 5 and that pairs correctly with the dongle.
Problem found later – The audio to the headset goes on and off! Solution: firstly, make sure you have enough audio – the headset can mute under a certain level AND make sure you don’t have another device (such as a smartphone) also “paired” to the same headset – they will “fight over the connection! 73 Ed DD5LP.

You must be logged in to post a comment.